
Converting - Da Wheelz
There are lots of conversions you can do on the wheelz. Starting with simply adding
gubbinz right the way through to scratch-building your own.
Gubbinz...
Gubbinz is useful or decorative stuff that the crew have picked up.
It can include spare ammo and fuel, tools or extra weapons.
Even glyphs and trophies are popular gubbinz.
Basically take whatever unusual bitz you can find in your spares box
and stick them on your wheelz to make them more interesting and just a little
different from anybody else's.
A Kannon or maybe a Grot Blaster (originally from the Gorkamorka plastic sprue)
close to hand for the passengers in this trukk.
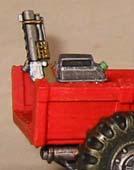
A glyph from the plastic Fantasy Orc Shield sprue.
Gorkamorka bitz...
There are lots of metal parts, originally designed for the Gorkamorka game, that
can be added to your wheelz. These are available from Games Workshop mail-order and are not stocked by their stores. The list includes
such fun bitz as weapons, armour, gubbinz, rams,
a boarding plank and a wrecker ball.
When I use mail-order bitz I have added a link to the vehicle's
page to show which items I've ordered.
The ram and the kannon on the bulkhead behind the crew are Gorkamorka bitz.
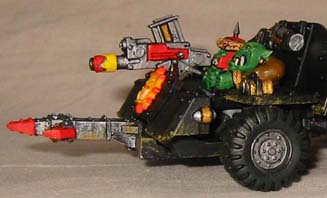
See also the trakk with skirts further down the page that has a gorkamorka harpoon gun.
Tailgate...
Here is a a simple tailgate that I scratch-built to make more room to stand models in my trukk.
All you need some plastic card, some piano wire and some chain to make this, available from any good model shop.
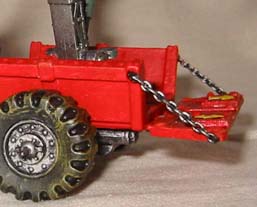
Here you can see the plan drawing of the tailgate. The last two pieces were made from
0.75mm plastic-card. The first E shaped piece was made from slightly thinner plastic
taken from a cream cheese packet.
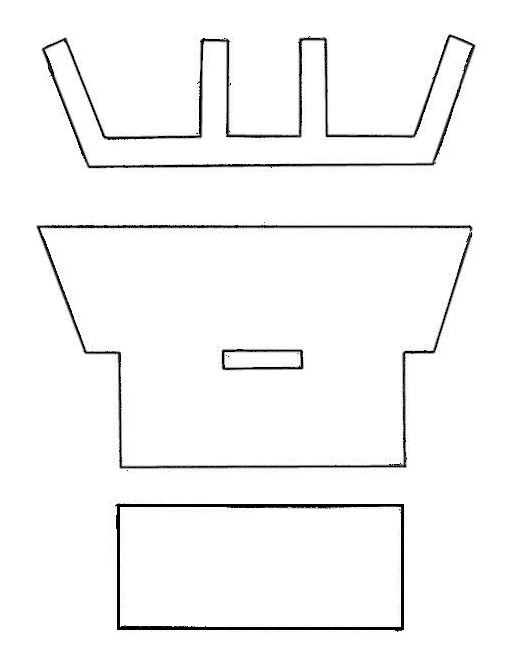
What you need to do:
- Glue the third (rectangle) piece into the underside back of the truck body
- File the back of the body down slightly so that it is level with this piece
- Glue the second (tailgate) piece in place
- Glue the first (E) piece onto the tailgate
- File the top of the exhaust pipes down slightly to make room
- Glue the body onto the chassis
- Drill 4 holes, two in the tailgate and two in the body
- Super-glue a short piece of piano-wire into each hole
- Super-glue two chains between pairs of wire
- Add glyphs and rivets to "taste"
Armoured Windscreen...
An armoured windscreen is just the thing to protect the crew from those nasty space marine boltguns.
This is made from 3mm square plastic rod, two small squares of plastic card (both available from any good model shop) and a the metal mesh used to repair holes in cars. To do this cheaper you
can probably get away with using plastic sprue instead of the rods and cream cheese packet instead of the plastic card.

What you need to do:
- Cut away the headlights on the top front of the trukk with a knife - you need to do this
because there won't be room for them to shine through the armoured windscreen.
- Cover the holes this makes with small squares of plastic card.
- Glue two struts to the back of the trukk's front armour plate, so that they stick up 2cm.
- Cut a piece of metal mesh 2cm by 4cm
- Cut out a hole in the bottom of the mesh to make room for the trukk's weapon
- Super-glue the mesh to the struts
Armoured Skirts...
Armoured skirts made from plastic card have been added to this trakk. It also has the twin linked big shootas replaced by a harpoon gun from the gorkamorka metal bitz.


What you need to do:
- File of the "bumps" from the outside of the tracks - just from the top
half that will be inside the skirts and then glue them to the body.
- Cut out two identical skirts from 0.5mm plastic card.
- Cut out two smaller rectangles.
- Add rivets to these rectangles. You can do this by holding them
in the palm of your hand (or any other soft surface) and pressing
from behind with a fairly large fairly blunt nail. Don't try
this on a hard surface like a table because it will just make a hole.
- Glue the rectangle in the middle of the skirts
- Glue the skirts in place, the fit is not very good at the front so
a little green stuff here will help.
- Make up the rest of the trakk as desired!
There are lots of conversions you can do on the wheelz. Starting with simply adding gubbinz right the way through to scratch-building your own.
Gubbinz...
Gubbinz is useful or decorative stuff that the crew have picked up. It can include spare ammo and fuel, tools or extra weapons. Even glyphs and trophies are popular gubbinz. Basically take whatever unusual bitz you can find in your spares box and stick them on your wheelz to make them more interesting and just a little different from anybody else's.
A Kannon or maybe a Grot Blaster (originally from the Gorkamorka plastic sprue)
close to hand for the passengers in this trukk.
A glyph from the plastic Fantasy Orc Shield sprue.
Gorkamorka bitz...
There are lots of metal parts, originally designed for the Gorkamorka game, that can be added to your wheelz. These are available from Games Workshop mail-order and are not stocked by their stores. The list includes such fun bitz as weapons, armour, gubbinz, rams, a boarding plank and a wrecker ball. When I use mail-order bitz I have added a link to the vehicle's page to show which items I've ordered.
The ram and the kannon on the bulkhead behind the crew are Gorkamorka bitz.
See also the trakk with skirts further down the page that has a gorkamorka harpoon gun.
Tailgate...
Here is a a simple tailgate that I scratch-built to make more room to stand models in my trukk. All you need some plastic card, some piano wire and some chain to make this, available from any good model shop.
Here you can see the plan drawing of the tailgate. The last two pieces were made from 0.75mm plastic-card. The first E shaped piece was made from slightly thinner plastic taken from a cream cheese packet.
What you need to do:
- Glue the third (rectangle) piece into the underside back of the truck body
- File the back of the body down slightly so that it is level with this piece
- Glue the second (tailgate) piece in place
- Glue the first (E) piece onto the tailgate
- File the top of the exhaust pipes down slightly to make room
- Glue the body onto the chassis
- Drill 4 holes, two in the tailgate and two in the body
- Super-glue a short piece of piano-wire into each hole
- Super-glue two chains between pairs of wire
- Add glyphs and rivets to "taste"
Armoured Windscreen...
An armoured windscreen is just the thing to protect the crew from those nasty space marine boltguns. This is made from 3mm square plastic rod, two small squares of plastic card (both available from any good model shop) and a the metal mesh used to repair holes in cars. To do this cheaper you can probably get away with using plastic sprue instead of the rods and cream cheese packet instead of the plastic card.
What you need to do:
- Cut away the headlights on the top front of the trukk with a knife - you need to do this because there won't be room for them to shine through the armoured windscreen.
- Cover the holes this makes with small squares of plastic card.
- Glue two struts to the back of the trukk's front armour plate, so that they stick up 2cm.
- Cut a piece of metal mesh 2cm by 4cm
- Cut out a hole in the bottom of the mesh to make room for the trukk's weapon
- Super-glue the mesh to the struts
Armoured Skirts...
Armoured skirts made from plastic card have been added to this trakk. It also has the twin linked big shootas replaced by a harpoon gun from the gorkamorka metal bitz.
What you need to do:
- File of the "bumps" from the outside of the tracks - just from the top half that will be inside the skirts and then glue them to the body.
- Cut out two identical skirts from 0.5mm plastic card.
- Cut out two smaller rectangles.
- Add rivets to these rectangles. You can do this by holding them in the palm of your hand (or any other soft surface) and pressing from behind with a fairly large fairly blunt nail. Don't try this on a hard surface like a table because it will just make a hole.
- Glue the rectangle in the middle of the skirts
- Glue the skirts in place, the fit is not very good at the front so a little green stuff here will help.
- Make up the rest of the trakk as desired!