Converting - Da Weaponz
Use weapons from the Ork Dreadnought...
The Skorcha, Rokkit launcher and Big Shoota can easily be added to a plastic Ork to make him an 'eavy. When you add heavy metal weapons to a light plastic figure you need to be very careful with the balance.
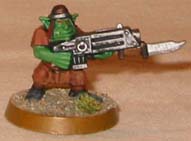
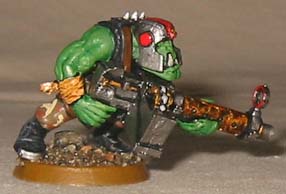
How to make a Burna Boy with an Ork Dreadnought Skorcha...

You need the following bitz:
- An Ork Dreadnought Skorcha available from mailorder.
- A head. You can either buy one of the metal burna boy heads, or convert a plastic head with helmet by adding a protecting visor out of thin plastic card. I bought the metal Burna Boy Head 4 from mailorder.
- The plastic shoota boy arms with leather arm bands.
- The plastic body with an armour plate front and back.
- Any pair of legs that takes your fancy.
- A plastic fuel "jerry" can, from the trukk or battlefield accessories sprue. This is the fuel supply and is carried on the boyz back.
- A piece of electric wire to be the fuel tube - I used the earth wire from an old computer cable.
- A spare sword from somewhere - I used one straight from the 40k ork plastic sprue.
Do the following:
- File down the arm bands on each arm and then build them up with green stuff to make some gauntlets. Not even an Ork holds a skorcha in his bare hands !
- File the back armour plate flat. Do the same for one side of the jerry can. This will be the backpack.
- Drill two holes, one in the "mouth" of the "jerry" can and one in the back of the skorcha. This should be fairly large so as to be able to fit the fuel tube; I used a 2,5mm drill.
- Glue all the bitz together !
- Leave the fuel hose to last, that way its easiest to get the length right from the fuel can on his back to the burna.
- Glue a coin or round piece of metal inside the base to help the figure stand firmly and not tip over under the weight of his new heavy metal skorcha.
Here's another boy with a Dreadnought Skorcha
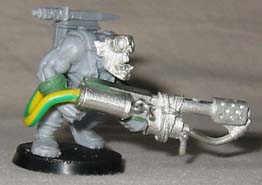
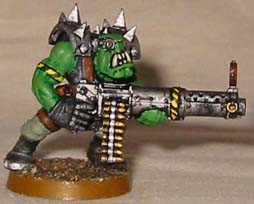
How to make a Big Shoota Boy with an Ork Dreadnought Big Shoota...
You need the following bitz:
- An Ork Dreadnought Big Shoota available from mailorder.
- A head. You can either buy one of the metal eavy weapon heads from mailorder, or use a plastic head. I chose to use a plastic head.
- The plastic shoota boy - without shoota.
- Extra ammo from the 40k ork plastic sprue - I think you need as much ammo as possible for your big shootas.
- The gun sight from the 40k ork plastic sprue.
Do the following:
- The first three are to make a better fit for the Big shoota. File the back side of the big shoota flat (the side that goes next to the Ork).
- Cut of the back side from the ammo box, before hanging it onto the big shoota.
- File away as much "extra plastic" as possible from the boyz stomach.
- I picked the shoota boy arms with rags tied round the wrists. The reason was that the left arm had a leather band round the upper part. I cut off the arms at the bottom of this leather band, rotated it outwards slightly and glued it back in place. A little work with a knife, a file and very little green stuff made a perfect fit. This makes the gap between the right and left hands slightly larger, because a big shoota is bigger than a shoota !
- I used a little cube of green stuff to build up the back bottom portion of the big shoota.
- Glue all the bitz together !
- Glue a coin or round piece of metal inside the base to help the figure stand firmly and not tip over under the weight of his new heavy metal gun.
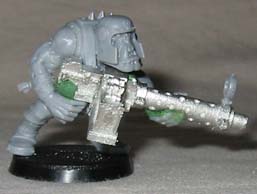
Make a Big Shoota from two plastic shootas...
There is only one big shoota model in the Ork range, so you really have to do some conversions just so you don't have two of the same in the same mob. The big shoota itself was made by combining two ordinary shootas from the plastic sprue , just add the barrel of one shoota onto the end of another shoota barrel. I used a metal "Heavy Weapon Head 2" instead of a plastic head on this figure.
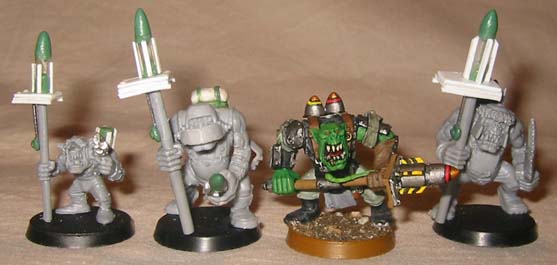
Scratch build Rokkits...
There is only one rokkit boy model in the Ork range, so you really have to do some conversions just so you don't have two of the same in the same mob.

|

|

|
You need the following bitz:
- An ork arm holding a spear or standard. I used a spear arm from the Fantasy Orc plastic sprue. If I didn't have one in my bitz box, I would probably have made one from a choppa arm and replacing the choppa with either a piece of plastic card round rod or maybe a cocktail stick.
- Green stuff.
- 0.75mm plastic card.
- A short piece of wire.
- A plastic tube that comes with paint brushes to protect their ends.
There are lots of small and simple steps to make the rokkit. If you do them one at a time and let the glue or green stuff dry fully before trying to use a piece in another step, then you shouldn't have any problems:
- Cut a 1cm long piece from the plastic tube.
- I put a blob of green stuff in the end of the tube and shaped it into a nose by rolling it between by thumb and fore-finger.
- Cut off the tip of the spear.
- Cut a strip of plastic card 14mm wide.
- From this strip, cut four pieces, 9, 7, 1 and 1mm in width; these will make the blast protector.
- Make a hole in the 14x9mm piece, near one end for the spear to go through. I used a leather punch to do this - the tool that I usually use to make holes in belts.
- Glue the 14x7mm piece on top of, and in the middle of the 14x9 piece.
- Extend the hole through the 14x7mm piece.
- Glue the two 14x1mm pieces on the bottom edge of the 14x9mm piece.
- Glue the blast protector onto the spear leaving 5mm of spear sticking out.
- Add four rivets to the top of the blast protector. Use a tooth-pick to drop dots of PVA glue at the four corners of the blast protector. You might need to repeat this a second time to make the rivets a little more pronounced.
- Glue the rokkit head onto the spear on top of the blast protector. My spear was narrower than the whole in the brush tube so I made the spear a little thicker with green stuff to make a good fit.
- Cut four pieces of plastic card, 10mm long and 2mm wide. Stick these onto the side of the rokkit as fins.
- Glue a small piece of wire to the side of the spear to form a detonator wire.
- Place a small ball of green stuff at the bottom of the wide and then push it into a disk shape with your thumb.
- Stick and even smaller ball of green stuff into this as the firing button.
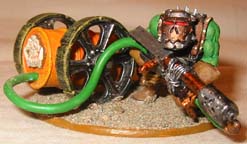
Everyone asked med why I made 3 rokkits in the first pictures, if I was only going to make one launcher. The answer is simple, to make a backpack too.


To make the backpack do the following:
- Find an Ork torso with two straps going over the shoulders. Glue this to the legs and base but don't glue on the head or arms yet.
- Remove any detail from the Orks back using a file.
- Glue the two extra rokkits onto the back.
- Using small bits of green stuff, fill in the holes between the body and the rokkits. Do this a small bit at a time and let the green stuff dry in between. It helps if you have a different painting project going at the same time.
- Using a larger bit of green stuff, roll it out into a flat thin sheet. With a sharp knife and metal ruler, cut a straight edge at the top. Wrap this round the rokkits with the straight edge upwards and then smooth out and blend in the bottom and side edges.
- Extend and build up the should straps with a small bit of green stuff so that they join the backpack.
- Add the head and arms last so they don't get in the way of sculpting the greenstuff. Like the right, the left arm was also taken from the fantasy Orc sprue.
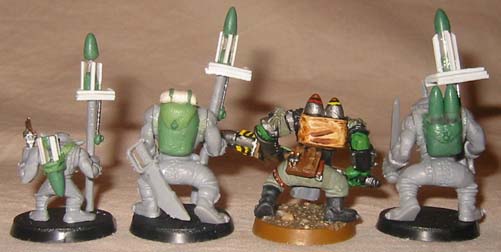
- Add a flap to the backpack with green stuff. This is a suggestion that I got from The-Waaagh after posting the first pictures. The flap can be seen in the group picture below.
The backpack on the second Ork was made using the same procedure.
- The bed-roll on top of the backpack was made using a strip of tissue paper 20mm wide. Warning: don't use toilet papaer as this disolves in water.
- Soak in water, and then fold in half into a 10mm wide strip.
- Roll up the tissue and tightly tie two pieces of cotton round the bed-roll; this will give small indents where the staps go.
- Glue the bed-roll onto the backpack with PVA glue.
- When dry, paint the bedroll with a mixture of PVA glue and water.
- When dry make staps from green stuff to cover the cotton binding.
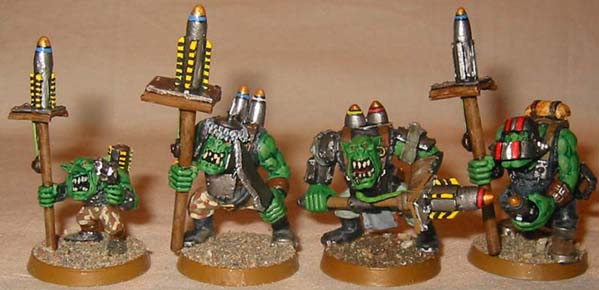
A group picture of two converted rokkit boyz and one converted rokkit grot. Painted is the original GW rokkit boy.
 |
 |
And finally when painted.
 |
If you would rather have a bazooka style rokkit instead of a GW original style rokkit then look here....

Bayonets...
Bayonets can easily be added using by converting choppas from the plastic sprue. You can even use spear tips from the Fantasy orc sprue.

Even a grot can have a bayonet - this one taken from the Necromunda close combat weapon sprue.